Basic Naalbinding
This is a very basic introduction to naalbinding, using the simplest possible stitch. Unfortunately, naalbinding is very hard to learn from a written description, even with lots of pictures. If you can, find someone who knows the technique to demonstrate. Once you learn, it is very simple. (Note: I learned from a book, so it is possible.)
Materials: A large needle. The best naalbinding needles are made of antler or bone, but a large tapestry blunt will work.
Unlike knitting, naalbinding can only be done with short lengths of yarn (about 18 inches), which are joined together as the work progresses. Wool singles are commonly used because they can be joined easily, but I have used plied yarn as well.
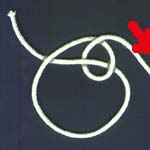
The basic stitch: Start by making a loop in the yarn. The red arrow marks the end of the yarn where the needle is.

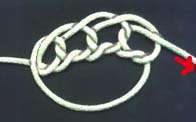
Hold this loop flat as shown above. Then put the needle through the loop from the bottom, over the lower part of the loop, under the upper part of the loop and over the loose end of the yarn. When the needle is through the previous loop, tighten it around the needle. The size needle used determines the gauge of the stitches. This picture shows a loose row of these stitches. The most recent one is on the right - trace it through the previous loop to see its over-under-over course. This stitch can be described more concisely as O/UO. The / shows the point in the over-under-over path where the yarn switches from moving deeper into the previous stitches to moving back out towards the edge of the work. Stitches of greater complexity are made by going through more than one of the previous loops and in different paths.

Since a single row of stitches isn’t very useful, the next step is to learn how to work in the round. Start by making a loop just like that in the first illustration, but larger than the one you used for starting a row of stitches. This will be the foundation for working a circle of stitches. Now work a stitch just as you did previously, but this time go through the foundation loop from the front before working the rest of the stitch.

Continue to work stitches through the foundation loop and through the previous stitch. The needle goes over then under the foundation loop, then over and under the previous stitch, and finally over the loop of the new stitch.

After you have a number of stitches worked into the foundation loop, pull the end to tighten this loop. Then continue working around the circle of stitches you have already made, but instead of going through the foundation loop, go through a stitch of the previous row in exactly the same way.
Increases are made by working two stitches into one stitch from the previous row, and decreases are made by working two stitches together.
More stitches.
